Showing posts with label #Handmade. Show all posts

Saturday, 21 October 2017

Jennifer Lauren - Laneway Dress

I'm sure if you've been sewing as long as I have you would have to agree that the internet has been a wonderful thing for us.  Instead on relying on books and magazines as our only source of new ideas, and relying on the big pattern making companies, we can now search the internet for indie designers all over the world.

There are some talented people out there.

Although I can pattern draft, I work a full time job, so don't really have the time to draft and test my own patterns.  The process is long, but, worthwhile.  However, when a girl just wants to make a garment in a weekend, the girl wants what the girl wants and so, I use patterns from other designers.  I can use my skills to alter a pattern, when I need to (believe me, as I've got older, I need to alter more).

I purchased the the Jennifer Lauren Laneway Dress pattern after I got picked as one of her pattern testers for the Afternoon Shift Dress. I really liked the style of the pattern, and knew that the design would suit me.

I had purchased these vintage buttons ages ago and decided they would look great on the bodice fold on this dress:


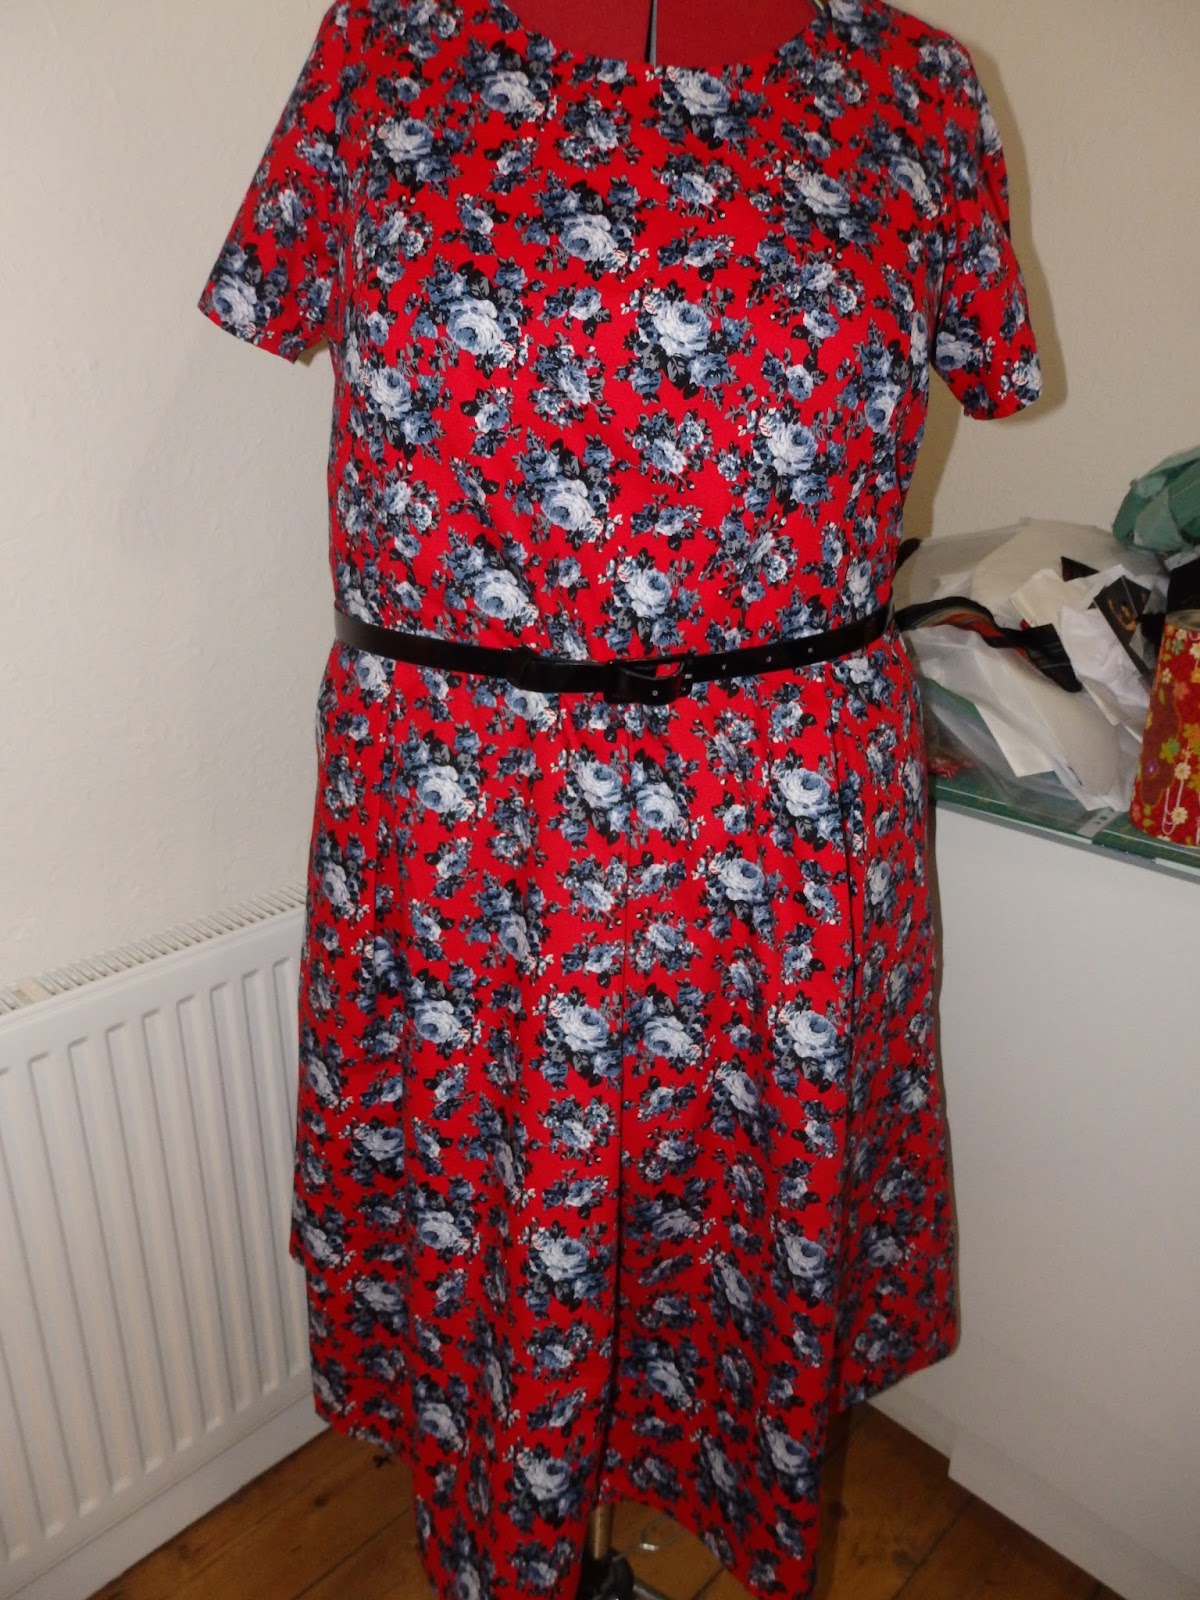
Yes, yes, I could have relied on my stash, that I have sworn several times that I would not add to. I failed. On a fabric shop expedition, I came across a poppy fabric in the remnants bins at Rathdowne Fabrics 2.5 metres for $14.50, how could I resist?  It was red, and spoke to me, and it evoked memories of travelling in the UK and seeing poppies wild in the fields near Stonehenge.  (Trouble was, I had to go back the next day to buy another 20 cm to finish the sleeves).

It was worth breaking my deal with myself, I absolutely love the finished garment.  The pattern itself allows for different bust cup sizes, and I added length by adding a black boarder at the hem of the dress.

The PDF pattern is easy to put together.  I quite like the way this has been planned by Jennifer.  Instead of having 50 pages printed out and put together in one length, she has planned it into more manageable pieces.  (I don't then cut this, I use this as my master and trace off it).

I like the fit of this pattern (including any adjustments I made for my measurements).

I think that the fabric is absolutely fabulous for this pattern.  Having said that, I have just bought some wax print fabric, but first, I must tackle a Gertie Hirsch pattern.

Happy sewing everyone.

Sandra


4 November 2017

I was nicely surprised to see that The Curvy Sewing Collective featured this dress on their blog.  I am flattered.

@rathdownefabrics, @jenniferlaurenhand, #handmadewardrobe, #memade, #memadeeveryday, #sewcialist, #letsmakethings, #letssew, #handmadeclothing, #sewinglove, #sewingproject, #sewing, #sewingpattern, #handmadewithlove, #lmakemyownclothes, #lsewclothes, #justkeepsewing, #plussize, #plussizesewing, #CSCMakes 

Saturday, 19 August 2017

Decades of Style 1940s Claremont Coat (Part 2)

Sewing is the one constant in my life, I've been sewing for longer than I can remember.  Sometimes the simplest of things can give us the most difficulties.

This blog post continues on from my previous post https://sandralovessewing.blogspot.com.au/

This pattern is a beautiful coat to sew.  The pattern is not hard, until you decide to stray from the instructions.  I knew that I wasn't going to hand sew the lining in (as per the instructions), so, one of my challenges was to bag the lining.  However, unlike my previous attempt at this technique, I wanted it to be perfect.  Herein lies the problem, when you strive for some sort of perfection, this in itself can be a blocker.  I never used to be like this, yes, I always have strived for my sewing items to be top quality finish, I think I think about things too much these days.

I overcame my block with bagging the lining, and am happy with the finish.  Then another blocker was thrown in my path.  The buttonholes!  Of course I couldn't finish the buttonholes, the fabric was too thick for the automatic buttonhole to work efficiently.

Then it was suggested to me that I could make a bound buttonhole.  So, I thought about it for a while, did a bit of research, and decided that it would have been better to have planned to do this from the beginning.

Back to the drawing board.  I could:
  1. get a business that specialises in button holes to do the button holes for me.
  2. hand sew the button holes
  3. investigate whether there was an attachment for my machine that would deal with bulky fabric
The third option began to grow legs after investigation on good old Google.

Phone call to my sewing machine centre, and low and behold, I have finally finished my @decades_of_style coat.  Set with vintage buttons:


So, lesson learnt:


  1. Plan all aspects of your sewing from the beginning
  2. Make sure you've got all the right equipment to do the job
I will make this coat again, it feels very nice on.

Happy sewing everyone, glad I got this one done before the end of winter!

Sandra

#vintagesewing;  #vintageinspired; #handmadewardrobe; #memade; #memadeeveryday; #isew; #ilovetosew; #lovetosew; #handmadewardrobe;  #handmadeeveryday #sewcialist #letsmakethings #letssew #handmadeclothing #sewinglove #sewingproject #sewing #sewingpattern #handmadewithlove #imakemyownclothes #isewclothes #justkeepsewing, #plussize, #plussizefashion; 

Saturday, 29 April 2017

Vogue 8682 (V8682)

I've decided that it's really hard to concentrate at work when it is a Monday, and that Monday is the day before a public holiday.

My mind is on sewing projects and not on work.

In a previous post I mentioned that I was overcome by my sewing stash, I went around the house telling my husband, "Hi, I'm Sandra, and I have a fabric problem".  Now to tackle some of that problem.

I pulled out some patterns to, that I always had the intention of sewing, but never did.  The first one to get off that table of mine is Vogue 8682.  I then went through my stash and found four metres of red peach skin fabric.  (Now, are you having flashbacks to the 1990s?)  That's exactly how long I've had this piece, it was quite vogue back then, I love it's texture, it's probably the closest you get to a fake suede, but in a fabric form.  It will do nicely when the days become cooler (at present I've the fan on in our office and wearing a summer dress!)  OK, I'm not working either, when I should be.


Pattern:  V8682

What adjustments did I do to this pattern?

  • 3cm (1") adjustment to extend the length at the waist
  • I chose the short length with the long sleeves (long sleeves with longer length reminded me of a nightie).
The pattern called for a 22" zip, I had a 18" one on hand and finally decided to go with this because the fabric itself has some stretch.

I am very happy with the outcome.  It is comfortable and and easy pattern to put together.

Those quick projects that add to our wardrobe are just the best.

Items used from stash today:  reel of cotton and overlocking thread; four metres of fabric; one zip.

Happy sewing everyone.

Sandra


Sunday, 23 April 2017

Patchwork - Buzz Saw Design

I had one of those Tim Gunn, 'make it work' moments again when attempting this design, plus I was limited in the amount of owl fabric I had.

The first block worked out well, it all went astray after that one block.  I got discouraged, and resigned myself to the fact that it may have to be thrown out along with the attempt of the next block.

I put it away, made three tops and two other quilt tops and got back to it.  I squared up the block (it was more of a rectangle beforehand) and finished it off to make another baby quilt top.


It needs a press, but I did make do with what fabric I had on hand.

The instructions I used (I am not going to name and shame) were partially to blame for what went wrong with this quilt top.  However, in the end I am happy with the end result.

What I find with sewing is, that most of the time things go along well, however, sometimes some curvers come our way.  We have two choices at this stage; throw it out and start again or try and problem solve the problem.  It is much more satisfying when we problem solve and come out with a satisfactory result.

How has your sewing been progressing?

Happy sewing.

Sandra

PS Some other leftover 'mistakes' did make it into the bin!

Sunday, 16 April 2017

One feature fabric influencing patchwork design

I've been going through my fabric stash (that's really a whole story in itself).  When I came across some fabric that reminded me of the story of Cinderella.  It's not really, just a prince chasing his damsel, the things fairytales are made of.

I had so little of this fabric, it was sent to me when I ordered something online as a sorry because the order was delayed, unnecessary, but thoughtful.

So, as I was going through this stash, this fabric 'spoke to me'.  Since the last lot of patchwork tops, we have discovered three more pregnancies at work - we were ahead with our quilt making, these pregnancies put us behind again.

Here are two versions of how I used this feature fabric (very bright and colourful):


So, from now on, I'm trying to stick to my stash, I DON'T need to buy anymore.  This is going to be hard!

What sewing projects have you been doing?

Sandra

PS this means that I have destashed four five pieces of fabric!  Yay!

Wednesday, 5 April 2017

Simplicity 2148

I've gone through my sewing patterns and picked out a bunch that I want to make.

Some years ago I cleared out my winter wardrobe and haven't quite restocked.  So, I decided that the first thing I had to make were a few stretch fabric tops using my coverstitch machine.

I picked Simplicity 2148.  When I originally purchased this pattern I did so with the intention of entering a competition with the Australian Sewing Guild, their selection of patterns left me uninspired, so the pattern just sat there amongst my stash.

With my new coverstitch and a desire to improve my skills with working with stretch fabrics I decided that I would make one of the tops in this pattern set.

This is View A from this pattern:


It's made from a light woollen knit fabric, it'll do me during winter as I don't like to dress too warmly anyway

I'm happy with the top.

Happy sewing everyone.

Sandra

Saturday, 28 January 2017

Burda - Vintage Chic Polka-Dot Dress

Ah, the holidays are at an end, school starts back tomorrow, only six weeks until a public holiday long weekend and nine weeks until the end of term one - but, who's counting?

I've had productive break with all my sewing.  My final dress for summer is a BurdaStyle dress from the book BurdaStyle Modern Sewing, which features 24 plus size patterns from Burda's magazines.

I've been intending to make the Vintage Chic Polka Dot Dress for a while and finally it's day came. No Polka-Dots here.

I had a piece of black polyester fabric in my stash that I wanted to use.  Yes, yes, a bit unusual for me to want to make a black dress, but black is useful and coordinate's well with other items.  Plus, it's a very Melbourne thing to do - wear black, that is.  I had enough fabric to make the dress, but with short sleeves.  So, short sleeves it is.

I just had to make my normal adjustments for my size to it.  Here it is:


The fabric is a bit difficult to work with, although the only place it gave me some trouble was in the collar, it also creases easily.  I know why the collar is flipping slightly upwards, so this will be rectified next time.

The next time I make this it will be in a cotton.  I will probably not waste my time putting in a zip at the side next time as it is easy to put on when you undo the buttons.

Will I wear it?  Yes.  It feels good to wear.  It's a good pattern, I probably decided to go with a stash fabric just in case I didn't like the pattern.

My overlocker (serger) was sent off for a service on Friday, seems that new blades are in order.  Not bad, I've had the machine since the early 1990s; paid good money for it at the time (we were running a business at the time and needed a sturdy machine).  When I took it in it still got good reviews from the serviceman. I thought this was a good time to take it in as I really couldn't see myself working on an outfit on my first week back at work.  It'll be back by next weekend, so, that's well timed.

Maybe some patchwork is in order in the meantime?

When my overlocker returns I will be focusing on Winter clothing (since I got rid of most of my Winter wardrobe in my latest clean up of clothing).

Happy sewing everyone.

Sandra

Tuesday, 27 December 2016

Sewing Room clean out

I'm fed up with my sewing room!  Yes, I said it, in the craziness of the end of the school year and then Christmas, everything seemed to be dumped in there.  So, when I began tripping over things - it was time for a clean up and cleanse.

In my journey through this room I found some hand embroidered bibs that I had from a time when I was in a small business with a friend - guess what?  I'm going to sell those now.


Then I found some watch making kits - you guessed it, I'm selling those.


Smocked socks:


Then, there's a bag of fabric, yes, I'm selling some fabric.  Quilt hangers.

I just need to make some room, besides the cash can be used to buy something else I'm after.

Better get back to that sewing room.

Hope your Christmas was a good one.

Happy sewing everyone.

Sandra

Tuesday, 20 December 2016

Kris Kringle gift - McCall's M6132

Maybe I just work better under pressure.

As a part of my Kris Kringle gift I decided to make my KK an apron.  Why an apron?  Because if you willingly clean out the fridge at work, you need a special apron to make the task more bearable!  Besides this pattern makes me smile.  I hope it does the same for her.


I have combined two things I know she likes into this apron.  Cats and the colour green!

I had this vintage fabric that I have had for a while, I have come to the conclusion in my life that I need to use things instead of them becoming objects that you just look at or that become someone else's problem when you're no longer around.

This is a lovely pattern, I have used it before.  It is easy to put together.  It allowed me to do some applique and use some of the other types of stitches I don't usually use on my sewing machine to complete the whiskers, mouth, ears and nose. So, if you are looking for an apron to make, this is a bit of fun.
I actually made two of these in the same fabric, the other is for a friends birthday.

I want to make another two, one of which will be for me.  More of that at a later date.

Merry Christmas everyone, the real gift is in the giving.

Happy sewing.

Sandra


Friday, 16 December 2016

Lingerie Design - Full slip

In my next post, I'II be revealing my red dress, for the little red dress challenge.  Trouble is, it is made from a fabric that has see through bits.  I don't think my husband will let me leave the house until it is less see through!!

I contemplated lining it, threw out that idea and decided to make a slip instead.

Trouble is, I am not in the mood to draft the pattern, I just wanted to get it done and move on with other sewing.

I decided I would use the same pattern that I used in my red dress, but alter it using some basic drafting techniques and apply it to this alteration.

I am pleased with the outcome:


It fits quite well on me, appears wonky on my dressmaking dummy because my room is a mess, and,  my dress is no longer see through!

Tell me, do you want me to post a tutorial on how to do this?  It really was very simple to do.

Well, I'm determined to make it to my blog goal of 52 blog posts for 2016.  I can see that I am fairly close to this now, so, I will work hard to attain it.

Any suggestions as to what you'd like to see on this blog in 2017?

Merry Christmas everyone.

Sandra

Tuesday, 11 October 2016

Keep yourself decent....


My experience with wrap around dresses is that they fly open in the wind.  Not good, they always fly open at the wrong moment. You may recall I made two of these dresses from Ottobre Design in a previous post, I also needed to make one because my Japanese voile dress was quite see through:


Also, in a recent post I made my go to pattern Simplicity 2371, which also was made of voile, so a half slip was necessary.

I had purchased some stretch silk some time ago for this very purpose from Rathdowne Fabrics. 

Making a half slip is very easy, and no pattern is required.  I have purposely made this slip to sit around 5 cm (2") above my knee.  I don't usually wear my dresses or skirts above my knees, so this suits me.

To make this half slip, I did the following:

1     I measured my hip measurement and added 3 cm ease plus 2 cm seam allowance
2     I decided what my length should be and added 5 cm to this length (2.5 cm for the hem and 2.5            cm for casing for elastic (just remember that the finished length needs to be shorter than your              finished dress)
3     I used the french seam technique to finish the side seams

       (a)   Place right sides of the fabric together (at the seam)
       (b)   Sew a 2/8" seam, trim to 1/8"
       (c)   Press seam
       (d)   Fold the fabric (right sides together)
       (e)   Sew a 3/8" seam
       (f)   Press
5     On the top end, turn over and press 2.5 cm, sew into place and leave an opening to insert elastic,          secure elastic and sew up the opening
6     Turn in side seams and hem and sew around this edge
7     Attach lace (since my fabric was a stretch silk I used a stretch lace) around the hem of the slip.

If my instructions don't make sense to you, here's a visual one from Craftsy.

Had I made the slip at a length below my knee I would have had to leave the side seam open at either one or both side seams.  This opening would give you room to move freely.

Happy sewing everyone.

Sandra


Saturday, 6 August 2016

Japanese Obi

Recently l was given this Japanese Obi and fabric.
I don't know whether l can bear to cut the Obi up.  I guess if l don't, it'll just be placed in a cupboard, and if l cut it up, then l feel that l've cut up a piece of history.

What to do?  I really don't know.


I think l'm going to send it to the dry cleaners and decide on it's outcome after it comes back.

Have you any suggestions to give me?

Happy sewing everyone.

Sandra

Wednesday, 20 July 2016

Pattern Drafting Wonderland


Well, I've made a commitment. A commitment to work on my pattern drafting for at least the next six months. That doesn't mean I won't keep using Ottobre magazines nor Patrones.  It just mean I want to hone my skills and wear the sort of clothes or styles that are essentially me.

I'm tired of buying patterns, usually, they don't fit and I have to adjust anyway.  The sleeves in patterns are usually too short and so is the neck to waist measurement. So, I always have to adjust anyway.  My, I'm making my body shape sound like I'm a monkey!

I use a pattern drafting system called SitamAB. A number of years ago I did some study in pattern drafting.  Getting back to it is hard.  I tend to use a mix of this system and knowledge from traditional pattern drafting.  It's going to take me a while to get the hang of things again.

I have been wanting to make a shirt for a while.  I guess I was inspired again by the final episode of The Great British Sewing Bee. In this episode contestants made a men's fitted shirt. I obviously wanted a women's fitted shirt with a sleeve placket done in the same way as this episode, and french cuffs on the sleeves to accommodate cuff links.

Cuff links on a women's shirt? You'd want cuff links to if you had bought these vintage cuff links:


So, I really liked the way a placket is done on a men's shirt.  I'd never done this before.  Good old Google found me the perfect set of instructions at http://www.threadsmagazine.com/item/25307/how-to-make-a-precision-placket/page/all  the first placket took a while, but, oh, the second sleeve placket came together so, so much more easily.

Here's the first placket:


Eat your heart out The Great British Sewing Bee, actually thank you, for being an inspiration.

Google, Google you are a sewists dream come true, we are able to ask questions and get answers to our many questions; we are able to tap into other people's experiences.  What a grand time to be sewing.

Here is my toile, yes, I know it's not in calico.  My first one was, and I was about to do it in calico again after I'd made some adjustments; but, in the corner of my room lurked a piece of cotton twill I'd destashed and decided "what the heck, if I mucked it up, too bad and if it worked - bonus!"

So, here's the toile, I do need to make some minor adjustments to the pattern, but I am happy with it:


Now to make another...

What have you been challenging yourself with?

Happy sewing.

Sandra


Friday, 1 July 2016

An important lesson, in sewing.

So, or sew. I tried the Fast and Fun Downloadable patterns - Hoodie Jacket.  It is an easy to follow and construct pattern.

I must admit, I had reservations before making this top because of the winged panels.  Reservations, because I am plus sized and prefer more fitted garments.

This is my final top:


Hang on you say, this has 'no wings'!  You know those reservations I had about the pattern, well I should have followed my gut feeling!  This is not a criticism of the pattern, in fact, the pattern has easy to follow instructions and is easy to sew, I enjoyed sewing it, it was just a poor choice of pattern for my figure type.

So, this is how the pattern should look:


It was all coming together nicely when, at 2 am (I was having a nice time sewing, a real luxury when you are on holidays), I thought I should have a look at what it looks like on me and on my dressmaking dummy:


No, no, no, I am not pregnant and do not want to encourage this look on me.  So, at 2 am I thought I better go to bed, because I knew that  to take the panel out and finish the top would take me equally an amount of time to fix as it would have taken me to sew.

The next morning I removed the side winged panels with the pocket and straightened out the back panel to match the front.

Would I make this pattern again in it's original format?  No, it's not for me.  I would however, consider doing it again in the modified form.  I would add pockets and fully line the hoody.

If you are thin, I would recommend this pattern, but, it's not for me.

I learnt two important lessons, I should just go back to pattern drafting, the work involved with adjusting a purchased pattern is not worth the time and, more importantly, don't stray from your own style.

Happy sewing everyone.

Sandra

Wednesday, 15 June 2016

Butterfly quilt - Celebrate the little things

This is our entry into the Minda Benefit Challenge Quilt as a part of the Australian Machine Quilting Festival.  I designed the butterfly block, and my friend Ronda - Anakie Quilter, did the machine quilting. I call it, "Celebrate the little things".


The theme of this years challenge is "Celebration".  A condition of entry is to use 6 fat 16'ths of fabric  (Colour Movement fabric range by Kona Bay) supplied in the quilt and it must measure a maximum of 100 cm on each side.

All entries must be original, well, I sweated on that idea for a while.

This quilt won't be coming home, all quilts entered will be donated to Minda Inc to be auctioned will full proceeds used to assist in supporting people living with an intellectual disability.

Butterfly design by Sandra D Copyright 2016

Butterfly design by Sandra D Copyright 2016

Butterfly quilting by Ronda - Anakie Quilter

Butterfly quilting by Ronda - Anakie Quilter


Back of quilt (you can see quilting more clearly)
I called this quilt "Celebrate the little things".

And my story of Celebration to accompany the quilt:

"From an ugly cocoon to a colourful, beautiful butterfly, as a child I was intrigued by the metamorphosis of a caterpillar into a beautiful butterfly.

A butterfly only lives for a short time.  To me, represents the small wonders of our world and new beginnings.  A butterfly, with its delicate wings and wonderful colours reminds me that we should take the time to celebrate the smallest things that give us joy and appreciate all that exists around us.

A butterfly is beautiful, and free."

So, it's packed and ready to be sent.

What have you been sewing?  Next to sew another outfit...a week and a half until holidays, the sewing machine awaits!

Happy sewing.

Sandra


Monday, 30 May 2016

Ottobre Design Woman Spring/Summer 2/2015


I got bored with trying to make little things to create a blog post every week.  It's fun to do little things, but, it lacked a challenge.  Working full time, with an hour each way travel to and from work, I do find it hard to complete a dress a week.

Ah, the good old days, living at home and sewing my going out dress for Saturday night and finishing just as I was about to leave the house on Saturday night.

Some time ago I made adjustments to this pattern to cater to my figure.  It appears, with age, my midriff has expanded, so, my measurements are the same for my bust and my waist. The other thing I added was a short sleeve.

I wanted a dress that was light, but one that would also keep me warm during winter.  Hence the reason I opted to stay with a fully lined dress.  I paired it with a belt that helps to create an elusion of some form of a waist.

Our winter days can often start off cold and gradually warm up to a point that it feels like you are doing a strip tease throughout the course of the day.

I am happy with the fit.  Perfect on the shoulders and very comfortable to wear.  It's red, it's bright, makes me feel good on a drab winters' day.  Especially in Melbourne when Winter is just a code word for wearing black!

Are you like me and calculated that there are seven months until Christmas?  Did you realise you'd have to start making your Christmas gifts very soon?  I did.

Happy sewing everyone.

Sandra


Akita - Seamworks

Seamworks patterns are designed to be made in about three hours and use simple finishing techniques - good for when you just want to quickly add something new to your wardrobe.


Front and back of this top are cut in one piece, two seams to sew and four yards of bias binding, and there you have it, a new top.

I am pleased with the fit and sizing of this pattern, I would recommend someone trying Seamworks patterns, the sizing is real, rather than fashion industry driven.

Plus I used a fabric that had been sitting in my stash from the 1980s, I bought this on the day that I decided in my sewing life, that you should always spend money on good quality fabric.  Bonus also I had the perfectly coloured vintage bias binding to match the top!


Happy sewing everyone.

Sandra

Sunday, 24 April 2016

Re-purposed container, now Wonderclip storage


Have you ever purchased a food item for the container it's in? Guilty as charged.  Or, maybe you've purchased a food item and not thought much of the container...until, I needed a container.  I purchased a container of steel cut oats; at the same time I needed a container to put my Wonderclips in.

The oats were coming to an end, mm, nice sturdy container...


But, I felt it needed more style.

Purchase some stick on fabric from Daiso, measure to size, stick on...


and there you go, a pretty container to put my Wonderclips in (thanks Red Tractor - great oats by the way):


Well, it's not technically sewing, but sewing related, as sewers we're always looking for something to store some sewing related item in!

Happy sewing everyone.

Sandra

PS I don't get paid anything for mentioning brands.  I just believe that owners of ideas, images, products should be acknowledged for the ideas, images and products they own.