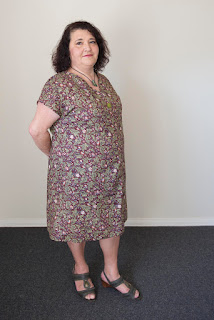
When you look at this pattern online, it is as simple to make as it looks. Since a friend and I are travelling to Singapore this December, where it would be hot, hot, hot, I felt I needed to complete a dress that was uncomplicated on those hot and humid days.
It was always my intention to make the dress and the blouse. In the end I made two dresses and the blouse. (You may tell from the look on my face that I hate having my photo taken).
 |
| Made from a voile - William Morris print |
 |
| Cotton fabric |
 |
| Polyester fabric |
A bit of background story is needed to the fabric used in the blouse. This fabric is about 15 years old. My brother brought it back with him from a trip to Malta (with another piece of fabric). It is only now that I have used this one. Because I haven't used the fabric until now, my brother said he wouldn't buy me any more fabric on his trips overseas. So, now I'm wondering, have I half redeemed myself and go back into the category of brother looking for fabric for me overseas?
Thanks to my brother Mark Avellino, from http://www.markavellinoweddings.com.au/ for the photos.
So, here is what I think about the pattern (although you may have gathered that I did enjoy making it from the two dresses and one blouse!
- Fit- I found the fit to be great. It is a comfortable fit. I didn't make any changes to the pattern. It turned out as I expected it to.
- Construction- This pattern came together as planned. I had no problems (didn't mean I didn't make mistakes). As named 'afternoon shift dress', well I made a dress and the blouse in one afternoon (helps if you are using the same colour thread on your machine)!
- Instructions- The instructions are easy to follow and clearly explain anything that may at first appear complex. I actually followed the instructions this time around (I have a habit of not necessarily following pattern instructions; however, as I was reviewing this pattern I thought that I better). I would recommend this to a beginner sewer.
- Pattern Printing- I used the print-at-home version, and everything came together well. This pattern is clever in the manner it is printed. When you print it you print off according the pieces your require. I had no problems figuring out my size. The instructions are very clear and would suit a beginner sewer.
- I was going to add a mini piping onto the neckline of the red and white top, however didn't. My decision not to had nothing to do with the pattern itself, but rather the fabric. Oddly enough this polyester fabric kept slipping and felt that the mini piping would add an unnecessary weight to the neckline and warp it. Having said this, I would like to make this blouse/dress again in more of a mid weight fabric that could take the added weight in the neckline, I think this would add a different effect to the neckline and in effect give it another look. Also, next time I might increase the length of the dress so that it is a tad longer. However, this is a personal preference rather than a criticism of the pattern.
Do try this pattern if you are looking for an easy to sew dress.
On my sewing table at the moment, is an Ottobre Skirt to go with the blouse and the Jennifer Lauren Laneway dress.
What have you been sewing?
Sandra
@jenniferlaurenhandmade; #jenniferlaurenhandmade;
#vintagesewing; #vintageinspired;
#handmadewardrobe; #memade; #memadeeveryday; #isew; #ilovetosew; #lovetosew;
#handmadewardrobe; #handmadeeveryday
#sewcialist #letsmakethings #letssew #handmadeclothing #sewinglove
#sewingproject #sewing #sewingpattern #handmadewithlove #imakemyownclothes
#isewclothes #justkeepsewing, #plussize, #plussizefashion; @sandraadee.a;
@anakiequilter, @markavellinoweddings


